Freestanding Handstand: How to Learn It, Train It, and What Comes Next
The freestanding handstand is one of the most telling tests of an athlete's proprioceptive ability and body control. Mastering it unlocks every advanced inverted skill in calisthenics — from handstand pushups to one-arm handstands to rings handstands — and signals a level of coordination that no other exercise can replace.
What Is the Freestanding Handstand?
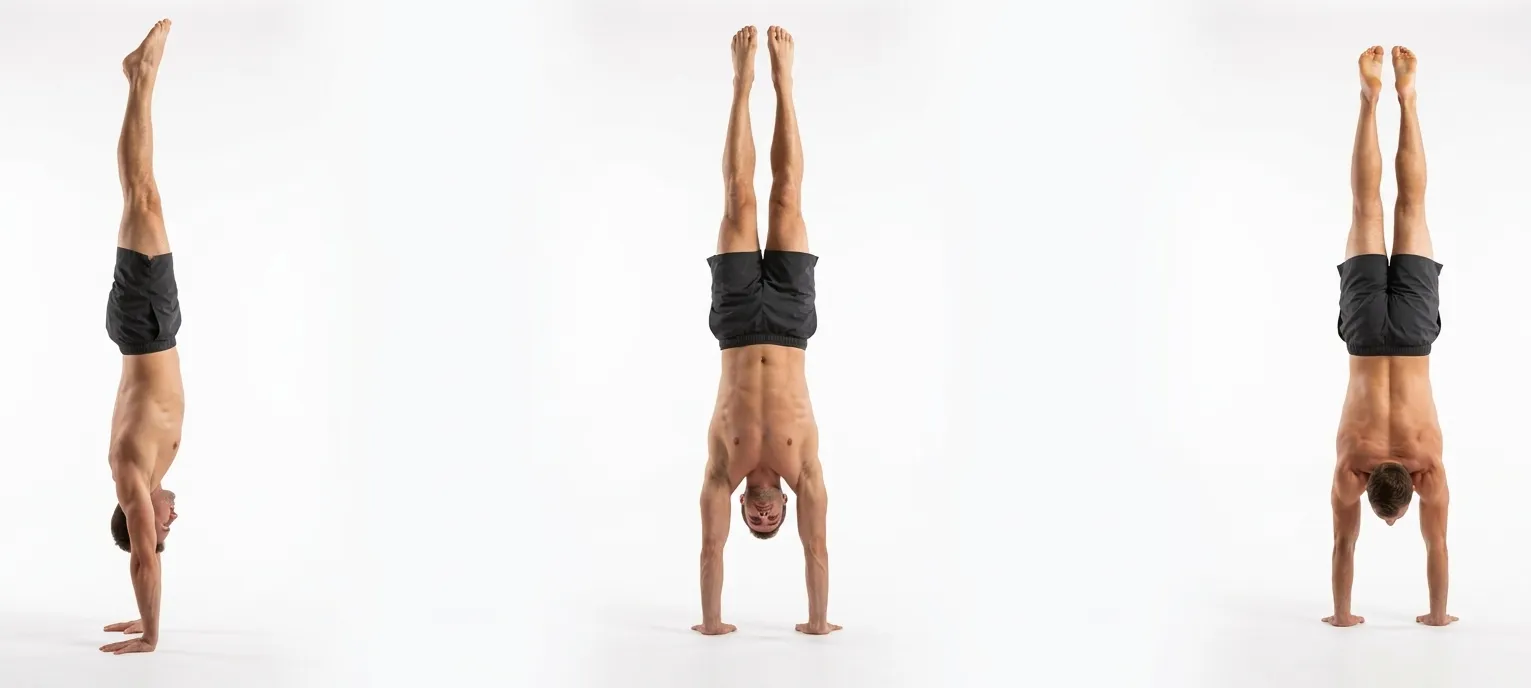
The freestanding handstand is a static inverted balance performed with no wall support, requiring refined proprioception and wrist control to maintain a straight, rigid body line overhead. In the Overcoming Gravity system, it sits at Level 5 in the Handstands branch — the first fully independent inversion skill and the gateway to every advanced handstand variation. Unlike the wall handstand, where the wall catches any over-balance, the freestanding version demands active, continuous correction through the wrists and fingers. Steven Low describes it simply: "a freestanding handstand is essentially a wall handstand without the wall."
Prerequisites
Before training the freestanding handstand, you need to demonstrate: Wall Handstand for 3 sets of 30-second holds.
This isn't just a formality. The wall handstand builds the specific scapular elevation, hollow-body tension, and overhead shoulder mobility needed to hold a stable straight line. Without that foundation locked in, the freestanding version devolves into shoulder-shrug-and-arch compensations that will haunt you for years. According to Overcoming Gravity, you must also develop bail techniques — specifically the pirouette and roll-out — before kicking up away from the wall, since over-balancing without a bail plan leads to injury and, worse, trained fear of the skill.
The Progression Chain
The wall handstand removes fear and builds the fundamental shape. The freestanding handstand introduces balance as the primary training variable — you are no longer developing the position, you are developing your ability to hold and micro-correct it. The one-arm support step (Level 6) begins shifting load progressively onto a single arm using finger-reduction protocols (4 fingers → 3 → 2 → 1), making the full one-arm handstand a gradual transfer of balance mastery rather than a sudden strength leap.
Sets, Reps, and Training Frequency
Progression standard: 3 sets × 30-second hold
Handstands are a skill exercise, not a strength exercise in the traditional sense — and that distinction changes how you program them entirely. Overcoming Gravity is explicit: handstand skill work should be trained every day once you are past the wall handstand stage, treated like a warm-up rather than a workout. Early on, your total accumulated inversion time per session may only reach 30–45 seconds before wrist fatigue or balance failure ends the set. That is normal and appropriate. As you adapt, you will work up to 5–10 minute blocks of freestanding kick-up practice per session.
For beginners making the wall-to-freestanding transition, Low recommends splitting your handstand block into two parts: continue working freestanding wall handstands (belly to wall, pushing toes off for seconds at a time) alongside actual kick-up attempts. Once you can consistently hold 30 seconds or more in the freestanding position with a straight body and minimal wrist corrections, drop the wall work and focus exclusively on the freestanding kick.
Volume should stay modest — skill work must not leave you fatigued before your strength training begins. If wrists are limiting your practice time, cut the session short rather than pushing through discomfort. Building slowly over months is faster in the long run than aggravating a wrist and losing six weeks of training.
Coaching Cues
- Use fingers to correct balance — The only correct way to balance a handstand is through the wrists and fingertips. Pressing through the fingertips stops a forward tip; relaxing them corrects a backward tip. Beginners instinctively use the shoulders and hips to compensate, which introduces body-shape changes that make the balance harder, not easier. Train yourself to keep the body rigid and let the wrist do all the work.
- Maintain hollow body position — A hollow body — ribcage pulled down, glutes squeezed, toes pointed, legs together — creates a single rigid lever that the wrist controls. An arched back creates two joints (hips and lumbar) that each have their own wobble, effectively making balance twice as difficult. Spread fingers wide and push the floor away to lock the scapulas in elevation before attempting to hold.
- Look between your hands — Eye gaze determines where your neck goes, and your neck affects shoulder alignment. Looking too far forward drops the chin and rounds the upper back; looking too far back causes excessive arch. Looking between your hands keeps the cervical spine neutral and the ears in line with the arms — the same straight line you are trying to maintain everywhere else.
Common Mistakes
- Balancing with the shoulders and hips instead of the wrists. When beginners feel themselves falling, they bend at the shoulder or hip to compensate. This creates a banana shape that is impossible to hold steadily. Fix it by deliberately keeping the body rigid and accepting small bail-outs rather than contorting to stay up.
- Insufficient scapular elevation. Collapsed shoulders — not fully pushing the floor away — create a soft, unstable base for the whole structure. Your scapulas must be maximally elevated and then slightly retracted to lock in stability before the hold is attempted. Think "push floor away and shrug your ears toward your hands."
- Under-balancing and over-balancing on the kick-up. Modulating kick-up force is a separate skill from the hold itself. Consistently under-kicking or over-kicking is a sign that you need more kick-up practice as a standalone drill, not just more hold attempts. Practice stopping the kick exactly at vertical until it becomes automatic.
- Skipping bail technique practice. Training handstands without first drilling the pirouette and roll-out means every over-balance is a potential crash. Drilled bails remove the fear that causes athletes to hesitate and lean into the wall rather than attempting genuine freestanding holds.
- Too much volume too early. Ten minutes of handstand attempts in the first week will destroy your wrists. Start with 30–60 seconds of total inversion time per session, add 15–30 seconds per week, and only increase volume when wrists feel fully recovered before each session.
Prehab and Longevity
Handstand work is uniquely demanding on the wrists because it loads the extended wrist position repeatedly — the opposite of every other gym activity. Overcoming Gravity prescribes dedicated wrist prehabilitation on every push day: wrist pushups 1×10 (takes the wrist through full flexion range under load), dumbbell finger curls 1×10 (strengthens the finger flexors used for balance corrections), and straight-arm dumbbell rotations 1×10 (trains the forearm in the rotated position held during handstand balance). These are listed as push pre-hab in Low's own intermediate programming templates and should be treated as non-optional, not optional.
Before every session, perform 10–15 wrist circles each direction and move through wrist extension and flexion stretches on the floor: palm flat pointed forward, backward, and sideways, pulsing gently through each. If your wrists are consistently sore after training, Low is direct: reduce handstand volume first, add a rice bucket or dumbbell wrist curl protocol, and only return to full volume once they are pain-free for two consecutive sessions. Pushing through wrist pain in handstand training is the leading cause of training-ending overuse injuries in this progression.
Shoulder overhead mobility is the other constraint. You need a true 180-degree shoulder angle to hold a correct vertical line. If your arms drift in front of vertical when you extend overhead, you will compensate with lumbar arch. Shoulder dislocates with a band or stick, performed before each session, progressively expand this range — 3×10 is sufficient warm-up, with additional passive stretches if the limitation is severe.
BodyTree tracks your progression through all 228 calisthenics skills — from your first push-up to a full planche. Automatically generated programs, video proof, and a community of serious practitioners.
Get BodyTree — Free on iOS & Android