Muscle-ups: How to Learn It, Train It, and What Comes Next
The strict ring muscle-up is the gateway skill in calisthenics — the moment your training crosses from pulling to the rings to pulling above them. Mastering it unlocks a full spectrum of combined pull-and-push movements and builds the specific transition strength that underpins ring routines, advanced lever combinations, and every high-skill gymnastics movement that follows.
What Is the Muscle-up?
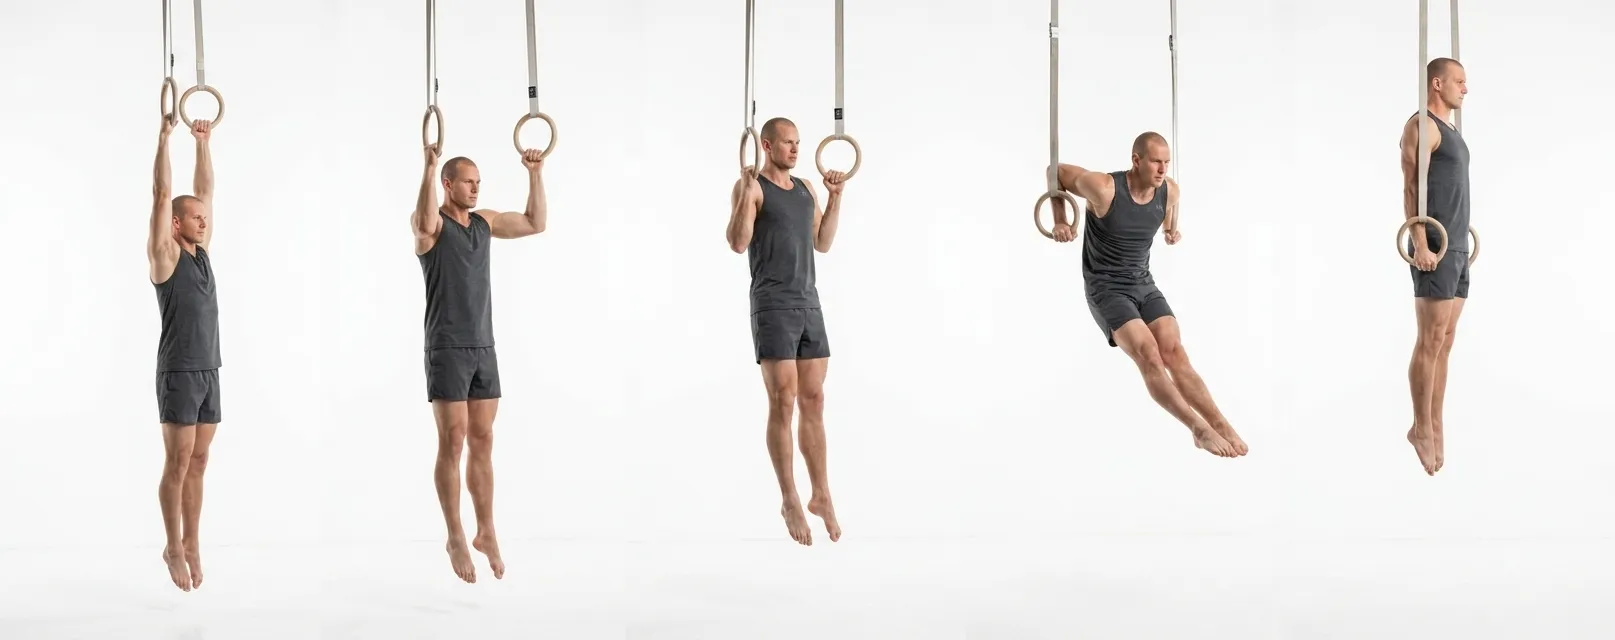
A strict ring muscle-up is a continuous movement from a dead hang through a full pull-up, transitioning at chest level into a dip, and pressing out to a locked support position above the rings — all without a kip or momentum assist. It sits at Level 5 of the Muscle-ups branch in the Overcoming Gravity progression system and is classified as a combined multi-plane movement, simultaneously training the full range of both horizontal pulling (the transition row) and vertical pressing (the dip-out).
Unlike the bar muscle-up, ring muscle-ups require the rings to stay glued to your sides throughout the transition. This demands far greater shoulder stability and scapular control, making rings the harder and more transferable training tool.
Prerequisites
Before training strict muscle-ups, you need to demonstrate: Kipping Muscle-ups — 3 working sets with clean, controlled repetitions.
The kipping variation builds familiarity with the transition phase — the single most limiting factor in the strict version. According to Overcoming Gravity, if you can perform five chest-to-ring pull-ups and five full ring dips (hands reaching armpits at the bottom), you have the raw strength to complete a muscle-up with correct false grip technique. Kipping muscle-ups fill the gap between "strong enough" and "technically ready," ingraining the movement pattern before you remove the momentum crutch.
The Progression Chain
Muscle-up Negatives (Level 3) are pure eccentric work — you begin in support above the rings and lower slowly through the transition to a dead hang. This builds the connective tissue and specific tendon strength in the biceps and shoulders that concentrics alone cannot develop. Kipping Muscle-ups (Level 4) introduce momentum via arch-hollow swing to make the transition achievable before strict strength is in place. Once you hold 3 sets of strict reps, Wide No-False-Grip Muscle-ups (Level 6) raise the difficulty by removing the leverage advantage of the false grip and spreading the rings wider, demanding greater explosive pulling power and a faster transition snap. Each step isolates a different physical quality — eccentric tendon strength, movement pattern, then raw pulling power.
Sets, Reps, and Training Frequency
Progression standard: 3 sets × 8 reps
When you first achieve strict muscle-ups, your working set may be only 1–2 reps. Overcoming Gravity recommends a hybrid set approach for building from singles: perform as many strict reps as possible (even 1-1-1 across three sets), then immediately supplement with muscle-up eccentrics or kipping muscle-ups to accumulate the remaining volume. A typical progression over four sessions might look like: 1-1-1 + 3×3 eccentrics → 1-1-1-1-1 + 3×3 eccentrics → 2-1-1-1-1 + 2×3 eccentrics → 3-2-1 strict.
Train muscle-ups 2–3 times per week with at least 48 hours between sessions. Rest 3 full minutes between sets — this is a high-skill, near-maximal effort movement and CNS recovery matters. Avoid training to failure on every set; leave one rep in reserve to preserve technique quality and reduce injury risk. Once you consistently hit 3×5 with clean form, begin targeting 3×8 before advancing to the wide no-false-grip variation.
Coaching Cues
- False grip on rings — The crook of your wrist (pinky side) sits on top of the ring so your palm is at ring-bottom at the transition. This wrist-over position eliminates the need to re-grip mid-air; without it, the transition requires significantly more height and explosiveness than most athletes possess at this stage.
- Pull high then transition — Continue pulling past chin height until your hands reach chest level, then row your elbows directly back and shoot your head forward between the straps. The transition is not a flip or a swing — it is a rowing motion that shifts your hands from in front of your chest to underneath your armpits. Pulling only to chin level is the most common reason people stall.
- Press to support — Once through the transition, the rings are close to your hips and your elbows are fully behind you. From there, press straight up to a locked-elbow support position with the rings turned out. Losing ring contact with the sides during the press is a sign of insufficient ring dip strength; address it with dedicated ring dip volume.
Common Mistakes
- Not pulling high enough. Most failed muscle-up attempts stall at the transition because the pull only reaches chin height. You need chest-to-rings contact. Build pull-up height by practicing chest-to-bar pull-ups as an assistance exercise before attempting the transition.
- Incorrect false grip placement. Placing the hand too far up the side (so the ring digs into the palm) or too low (so you're essentially in a normal grip) both kill leverage at the critical moment. The ring should sit directly in the crook between the pinky-side wrist and the hand, with your palm facing inward and slightly downward at the start.
- Flared elbows during transition. Elbows that drift out wide prevent the rowing motion from working. They must travel directly backward, close to the torso — almost brushing the sides of your body — to achieve the hand-under-armpit position that makes the transition possible.
- Rings drifting away from the body in the dip. If the rings move away from your sides after the transition, you lose mechanical advantage and risk shoulder strain. Actively squeeze the rings inward toward your hips throughout the dip-out phase.
- Skipping dip strength work. Practitioners who can do 10+ pull-ups but only 3–4 ring dips will consistently fail the press-out. Ring dips — specifically with the rings held close and turned out at the top — are the most direct assistance exercise for completing the second half of the muscle-up.
Prehab and Longevity
The false grip places significant friction load on the skin and connective tissue of the inner wrist. In the early weeks, expect skin abrasion at the wrist crease. Allow this tissue to toughen gradually — do not train through broken skin, as it prolongs healing. If wrists are raw, switch temporarily to muscle-up negatives or ring dip progressions that do not require a false grip. Athletic tape around the wrist crease can protect skin while healing, though it slightly reduces grip security. Wrist flexibility is also a limiting factor: if maintaining the false grip position is painful, add daily wrist circles and loaded wrist extension stretches to your warm-up. The book notes that poor wrist mobility is among the top reasons otherwise-strong athletes cannot hold a functional false grip under load.
BodyTree tracks your progression through all 228 calisthenics skills — from your first push-up to a full planche. Automatically generated programs, video proof, and a community of serious practitioners.
Get BodyTree — Free on iOS & Android