Wall Handstand: How to Learn It, Train It, and What Comes Next
The wall handstand is where every serious calisthenics skill journey begins overhead. It looks simple — you're just upside-down against a wall — but done correctly it is the precise diagnostic tool that exposes every weakness in your body tension, scapular control, and wrist resilience. Get this right, and the freestanding handstand stops being a mystery. Rush past it, and you'll spend months fighting bad habits that become harder and harder to unlearn.
This guide covers the wall handstand from the Handstands branch of the Overcoming Gravity progression system, the same methodology used in BodyTree to structure all 242 calisthenics exercises. It is the entry point of the entire handstand tree and has no prerequisite — anyone with healthy wrists and shoulders can start here today.
What Is the Wall Handstand?
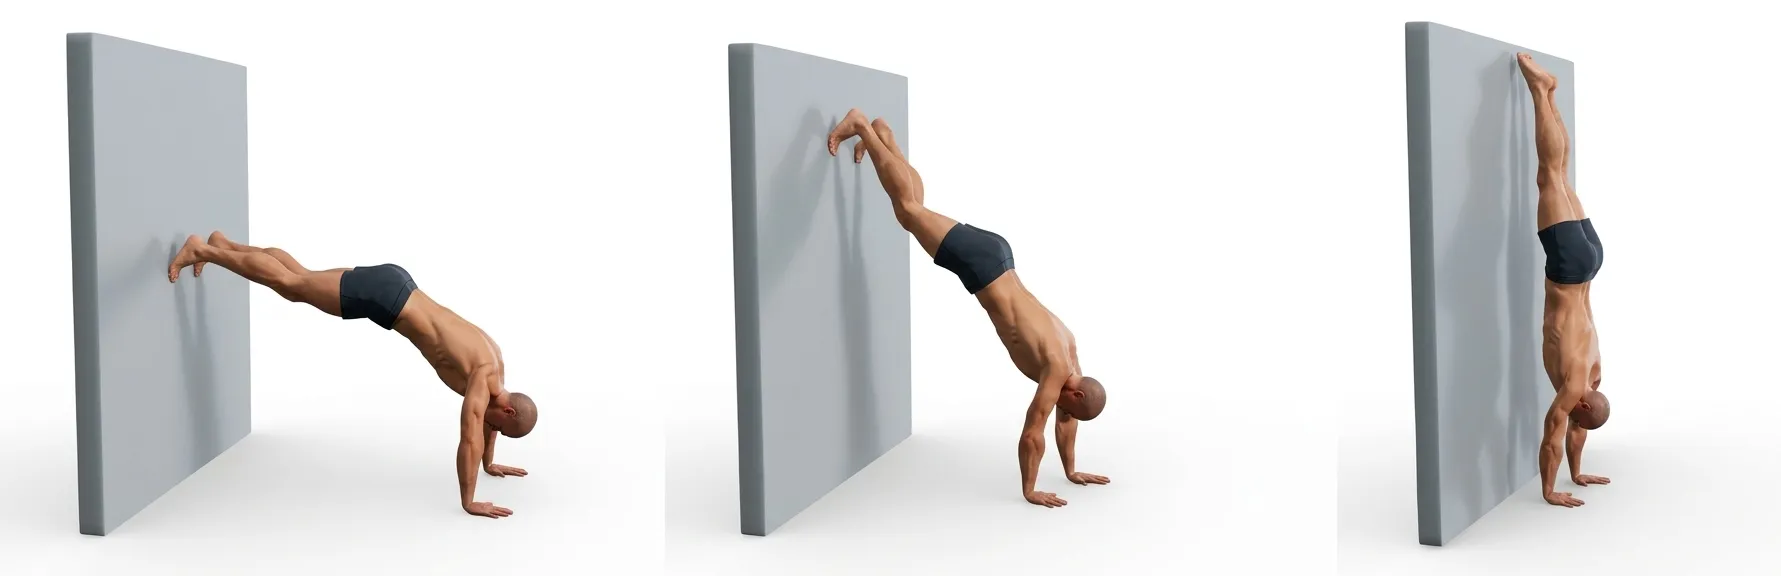
The wall handstand is an isometric balance hold performed with the feet resting against a wall for support. It belongs to the Handstands branch — a skill category that builds pure balance and proprioception in the inverted position, rather than pressing strength. The goal is not just to get upside-down, but to build a locked, hollow-body vertical position that transfers directly to freestanding balance work.
There are two common variations, and they are not equally useful. The belly-to-wall version (facing away from the wall, back arched, heels touching the wall) is common in gyms but trains poor alignment — the banana shape it encourages becomes a deeply ingrained habit that sabotages freestanding work. The chest-to-wall version (facing the wall, body hollow, chest near the wall) forces the correct position: stacked wrists, straight arms, protracted shoulders, hollow midsection, glutes squeezed. Every serious handstand coach and the Overcoming Gravity methodology advocate chest-to-wall from day one.
The unlock criteria in BodyTree: 3 sets × 30-second hold. This reflects the isometric nature of the skill — you're not counting reps, you're accumulating quality time under tension in a correct position.
Prerequisites
The wall handstand is the first exercise in the Handstands branch. There is no direct prerequisite in the chain. However, you should confirm two things before starting:
- Wrist health: Handstand training places the wrist in significant dorsiflexion under load. If you have existing wrist pain or limited range of motion, spend 2–4 weeks on wrist mobility work (wrist circles, prayer stretch, reverse prayer stretch, and slow wrist push-ups) before loading inverted positions. Ignoring wrist preparation is the number-one cause of early dropout from handstand training.
- Hollow body on the floor: If you can't hold a tight hollow body position lying on the floor for 30 seconds — ribs down, lower back in contact with the ground, arms overhead — you'll struggle to replicate it inverted. Practice floor hollow holds as a warm-up until the shape is automatic.
The Progression Chain
Each step in this chain removes one degree of external stability. The wall handstand gives you a fixed reference point — you can push into the wall slightly to correct, and your fear of falling is eliminated. That psychological safety is actually valuable: it lets your nervous system learn the correct muscular pattern without fight-or-flight interference.
The freestanding handstand (next in the chain) demands that your wrists and fingers take over the stabilization role the wall was providing. Finger pressure — pressing through the pads of the fingertips to correct forward tipping — is a skill that requires hundreds of hours of repetition to become instinctive. You build the raw strength and body shape at the wall; you build the sensitivity in freestanding work.
The one-arm handstand at the end of the chain is a elite skill that typically takes 2–5 years of dedicated training from zero. The wall handstand is day one of that journey.
Sets, Reps, and Training Frequency
Unlock criteria: 3 sets × 30-second hold, with holds performed in correct chest-to-wall position.
Unlike strength exercises that stress muscle fibers and need 48–72 hours of recovery, handstand training is primarily a skill and connective tissue adaptation. This means you can — and should — practice more frequently than typical strength work. Most practitioners following the Overcoming Gravity methodology train handstands 4–6 days per week at moderate volume, with at least one full rest day.
Beginner approach (0–3 months): 3–5 sets of maximum quality holds, 4 days per week. Rest 90 seconds between sets. Stop a set the moment form degrades — a 10-second perfect hold is worth more than a 40-second banana. Total daily handstand practice time should be 10–20 minutes including warm-up and rest periods.
Progression trigger: When you can consistently hit 3 sets of 30 seconds in a clean chest-to-wall position, with fully protracted shoulders and a hollow body, you move to freestanding work. Don't rush this transition — the quality of your wall handstand directly predicts the speed of your freestanding progress.
Wrist warm-up (mandatory every session): Wrist circles in both directions (30 seconds each), wrist flexor stretch (push-up position, fingers pointing back toward knees, gently shift weight), wrist extensor stretch (back of hand on floor, fingers pointing toward knees). This takes 3–4 minutes and significantly reduces injury risk in long-term training.
Coaching Cues
- Push the floor away, protract your shoulders. Actively push the ground away from you — don't just rest your weight on your arms. Protraction (rounding the shoulder blades apart and slightly forward) creates the "hollow" shoulder position that's structurally stronger and positions the scapula for the long-term overhead strength you'll need in handstand push-ups. Passive shrugging into the ears is the wrong pattern and leads to shoulder impingement over time.
- Squeeze glutes and point toes. Full-body tension is what makes a handstand feel "locked in" rather than a constant wobble-management exercise. Squeezing the glutes hard tilts the pelvis into a posterior tuck, which is essential for eliminating the arch in your lower back. Pointing toes is not aesthetic — it activates the entire posterior chain from calves upward and contributes to full-leg tension that stiffens the lever.
- Keep ribs pulled in, hollow body. This is the single most common failure point. When the rib cage flares out and the lower back arches, the handstand becomes unstable because the center of mass moves behind the base of support. Ribs in, lower back slightly rounded — the same shape as a tight hollow body on the floor. If you can't find this shape inverted, practice the floor hollow hold until it's automatic, then reapply it against the wall.
Common Mistakes
- Training belly-to-wall instead of chest-to-wall. If your heels touch the wall and your back is arched, you're training the wrong shape. Turn around. Face the wall. Yes, it's harder to get into, but every minute spent in belly-to-wall handstand practice is time you'll spend later unlearning the arch. Chest-to-wall only.
- Passive arms — hanging from the shoulder joint. A handstand is not a passive position. If your arms feel relaxed or your shoulders feel like they're sinking into your ears, you're hanging on the joint rather than actively pushing. The sensation should be one of continuous, active pressing — like you're trying to push yourself away from the floor even though your arms are straight.
- Holding through degrading form to hit the time target. A 35-second hold where the last 10 seconds are spent in a banana shape gives your nervous system mixed signals. Set a timer. When form breaks, that set is over. Record the time and try to beat it next session. Quality accumulation beats sloppy duration every time.
- Skipping wrist warm-up. The wrist joint is not designed to bear axial load through its dorsiflexion range without preparation. Cold wrist training is the primary cause of tendinitis in beginner handstand practitioners. The warm-up is not optional.
- Progressing to freestanding too early. The wall handstand isn't "beginner" work you escape as fast as possible — it's specific preparation. If you can't hold a tight, hollow chest-to-wall handstand for 3×30s, you don't yet have the body tension required for freestanding balance. Moving on too early means you'll have no stable base to balance from, and freestanding attempts will feel like controlled falling rather than balance.
Prehab and Longevity
The wall handstand loads the wrist primarily in dorsiflexion under bodyweight — roughly 80–100% of your body weight distributed across two wrist joints that most people have never trained in this range of motion. The connective tissue adaptation (tendons, ligaments, cartilage) lags significantly behind muscular adaptation, meaning you can develop the muscular strength to hold longer before your wrists are ready for that volume. This mismatch is where overuse injuries originate.
Wrist conditioning protocol: In your first 4–8 weeks, limit total handstand practice time to 15 minutes per session regardless of how your wrists feel during training. Tendons don't give clear pain signals the way muscles do — discomfort often appears 12–24 hours after a session, after the damage is done. Build volume gradually: add 5 minutes per session only when the previous volume feels completely comfortable for three consecutive sessions.
Shoulder prehab: External rotation strength in the shoulder is often underdeveloped in people who primarily push and press. Add 2–3 sets of band external rotations or Cuban presses to your warm-up. Strong rotator cuffs protect the shoulder joint when you're loading it in full elevation (overhead), which is exactly the position you're in for the entire handstand hold.
Long-term joint care: Many experienced handstand practitioners report that finger push-ups, performed on progressively harder surfaces, build the intrinsic hand strength and palmar connective tissue density that prevents wrist injuries as handstand volume increases. They're worth adding as a supplemental exercise once you're training handstands regularly.
BodyTree tracks your progression through all 242 calisthenics skills — from wall handstand to one-arm handstand, push-up to planche, pull-up to front lever. Automatically generated programs, video proof, and a community of serious practitioners.
Get BodyTree — Free on iOS & Android