
One-Leg-Bent L-Sit: A Beginner's Guide
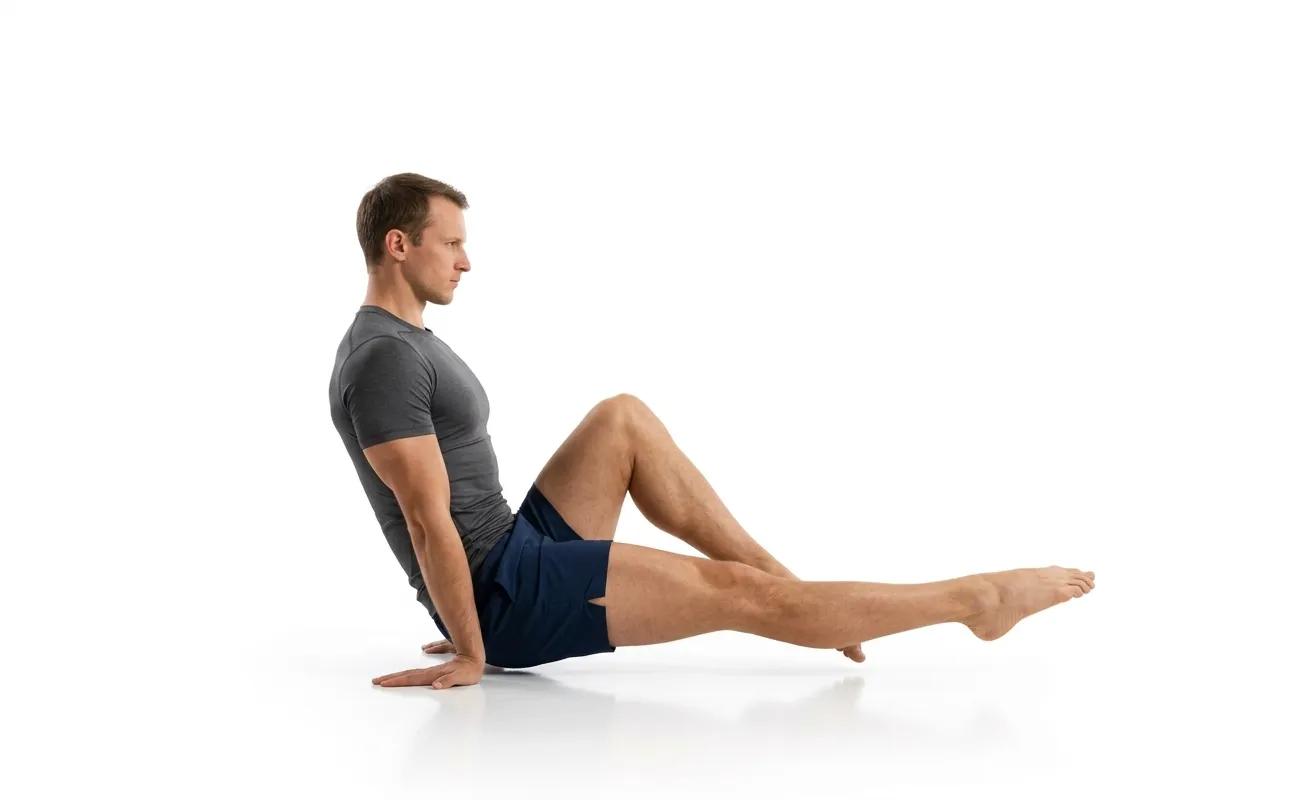
If you have never held an L-sit, do not start with the full version. The One-Leg-Bent L-Sit exists precisely so beginners have a gentle rung between the tuck L-sit and the full L-sit, and you can train it today on the floor with nothing but your own hands. You do not need parallettes, a gym, or a background in gymnastics. You extend one leg, keep the other tucked, and lift both off the ground. That single extended leg is the whole point: it teaches your core and hip flexors the compression they will need for everything that follows, without asking for all of it at once.
What Is the One-Leg-Bent L-Sit?
The One-Leg-Bent L-Sit is a seated support hold where you press down through straight arms, lift your hips off the floor, and hold with one leg fully extended parallel to the ground while the other stays bent. It sits in the L-Sit / V-Sit / Manna branch of the BodyTree tree and is a Level 2 skill. According to Overcoming Gravity it is the transition sequence between the tuck L-sit and the full L-sit, and in the Gymnastics Code of Points it is an A-level element. The extended leg adds just enough hip-flexor and compression demand to move you forward without the full load of two straight legs.
Prerequisites
Before training this hold you should own a clean Tuck L-Sit for 3 sets of 30 seconds, with your hips off the ground, arms locked straight, and shoulders pressed down away from your ears. If you cannot yet lift off the floor at all, that is fine, work the tuck L-sit first, or use raised parallettes, sturdy chairs, or a set of mats so your legs have room to clear the ground. Basic hamstring flexibility helps: a tight hamstring will pull on the back of the extended leg and shorten your hold.
The Progression Chain
Each step straightens the legs and asks for more compression. The tuck teaches the support and the shoulder depression; the one-leg-bent version introduces a single straight leg; the full L-sit asks for both. Because the road runs one small step at a time, you never have to make a heroic jump.
Sets, Reps, and Training Frequency
Progression standard: 3 sets of 30-second holds, alternating which leg is extended between sets so both hip flexors develop evenly. Train it two to three times per week with rest between sessions. According to Overcoming Gravity, splitting your volume roughly 50/50 between static holds and dedicated compression work pays off fast: sit on the floor with legs straight and hands by your knees, then pull your knees toward your face for 10-second holds. If it makes you cramp a little, you are doing it right.
Coaching Cues
- Press the floor away. Push down hard through your palms and lift the hips as high as you can.
- Depress the shoulders. Keep the scapulae pulled down and neutral so your shoulders do not creep toward your ears and your chest does not round.
- Straighten the extended leg fully. Lock the knee and keep that leg parallel to the floor; point the toes.
- Alternate legs between sets so you build the two sides evenly.
Common Mistakes
- Letting the shoulders shrug up. If your shoulders rise, you lose the active position that carries over to later skills. Press down first, then lift the legs.
- Fearing the cramp. Cramping in the abs, hip flexors, or the quad of the extended leg is a normal response in a fatigued muscle. Massage it out and keep going; consistent twice- or thrice-weekly practice makes it disappear.
- Rounding the back to fake height. Keep the chest tall and lift the leg by contracting the hip flexors and abs, not by collapsing forward.
- Ignoring tight hamstrings. If the back of the extended leg pulls, add short hamstring mobility drills to your warm-up.
Related Guides
Frequently Asked Questions
Is the One-Leg-Bent L-Sit good for beginners?
Yes. It is a Level 2 skill designed as the bridge between the tuck L-sit and the full L-sit, and you can train it on the floor with no equipment. Extending just one leg gives beginners the hip-flexor and compression demand of the L-sit in a manageable dose.
Why do my legs cramp when I hold it?
Cramping in the abs, hip flexors, or quads is a normal response in a fatigued muscle, especially early on. According to Overcoming Gravity, it dissipates quickly with consistent training two to three times per week. Massage the area, then continue.
How do I know when to move to the full L-sit?
When you can hold 3 sets of 30 seconds with one leg fully straight and parallel, shoulders depressed and hips up, start working toward extending both legs. Pair your holds with compression work to get there faster.
BodyTree tracks your progression through all 251 calisthenics skills — automatically generated programs, video proof, and a community of serious practitioners.
Get BodyTree — Free on iOS & Android