
Inverted Rows: How to Learn It
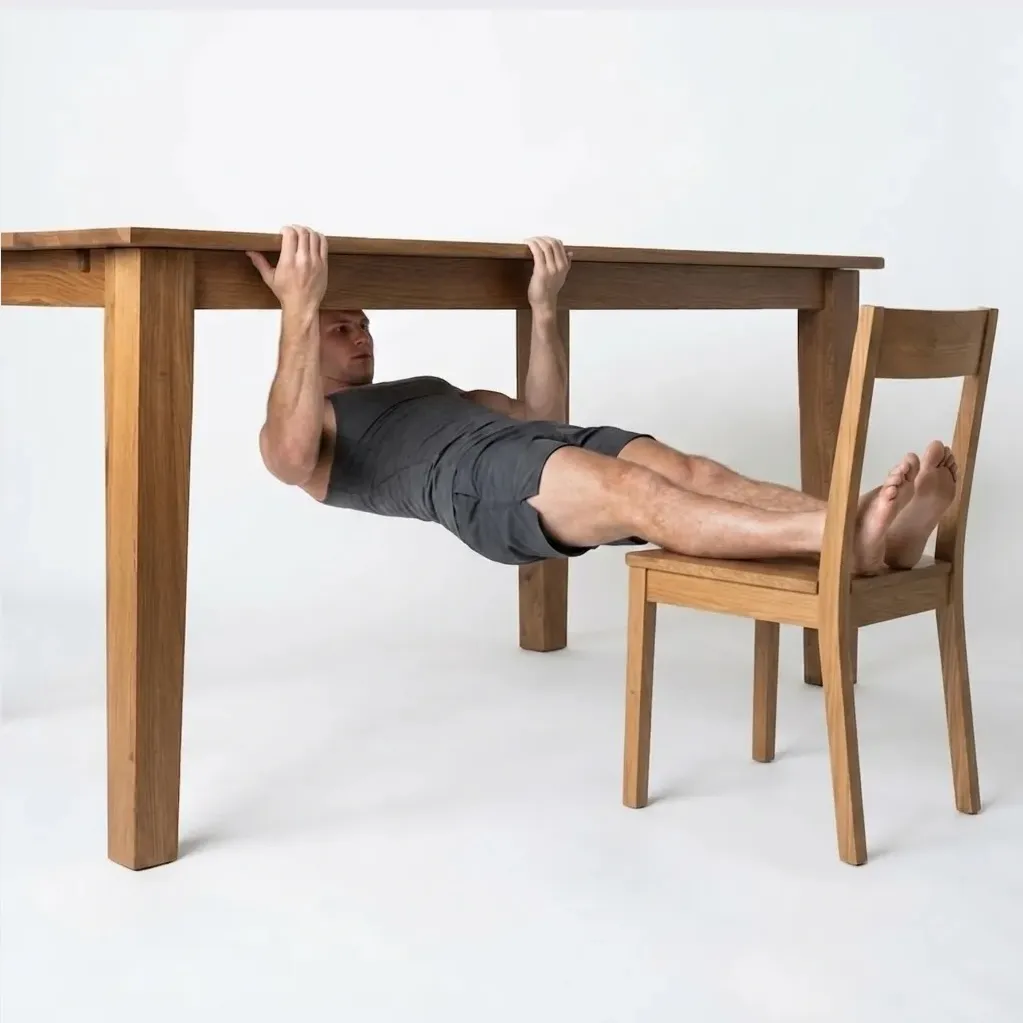
If you have never trained a pull in your life and a pull-up feels impossibly far away, the inverted row is where you begin. You lie back under a bar, a sturdy table edge, or a set of low rings, and pull your chest up to your hands. Your feet stay on the floor, so you decide exactly how much of your bodyweight to lift simply by changing the angle of your body. Stand tall and it is almost free; lie flat and it becomes a real strength challenge. That built-in dial is why it is the friendliest first pull in calisthenics: there is no version too hard for day one, because you can always make it easier. You do not need a gym, and you do not need to already be strong. You need something waist-high to hold and the willingness to start.
What Is the Inverted Row?
The inverted row is a horizontal pull. You position your body in a straight line under a bar or edge, grip it around shoulder-width, and pull your chest toward your hands while keeping the body rigid from head to heels. It lives in the Pull family of the BodyTree tree as the equipment-light horizontal pulling pattern, meaning you can train real pulling strength with nothing more than a low bar, a table, or a pair of rings hung low.
Where the pull-up trains vertical pulling, the row trains the muscles that pull your elbows behind you: the mid and upper back, the rear shoulders, and the muscles that squeeze your shoulder blades together. According to Overcoming Gravity, these areas — the scapular retractors, posterior deltoids, and external rotators — are the ones most people neglect, and rowing is how you build them.
Prerequisites
There is almost nothing to check off first, which is the point. If you can hold a short plank without your hips sagging, you already own the body tension the row asks for. If a flat row feels like too much, you start higher: with your body at a steep incline and your hands only a little below your chest, the movement becomes gentle enough for a complete beginner. The honest prerequisite is simply a surface you can grip that will hold your weight — a fixed bar, a heavy table, or low rings.
The Progression Chain
Each step keeps the same pulling shape and adds load by changing your angle. You begin lying face down and simply squeezing the shoulder blades together to wake up the pulling muscles. Then you row at a high incline, where little weight is lifted. The full inverted row is the body-horizontal version. Before moving on, the standard is 3 clean sets at your target range. From there you raise the feet to load past bodyweight, then widen the grip to hit the upper back harder.
Sets, Reps, and Training Frequency
Aim for 3 sets of 8 to 15 controlled reps. Overcoming Gravity places bodyweight strength and size work broadly in the five-to-twelve rep range, adding reps until you can move to a harder version — for a beginner, staying nearer the higher end while you build the pattern is both safe and effective. Train pulling two to three times per week with at least a day between sessions. When 3 sets of 15 clean reps feels controlled, make it harder by lowering your angle or raising your feet rather than chasing endless reps.
Coaching Cues
- Squeeze the shoulder blades first. Begin each rep by pulling your shoulder blades down and together, then let the arms follow. The pull starts in the back, not the hands.
- Stay in one straight line. Brace your abs and squeeze your glutes so your hips do not sag. Think of it as a moving plank.
- Pull to the lower chest. Drive the elbows back and down and touch the bar to the bottom of your sternum, then lower with control until the arms are fully straight.
Common Mistakes
- Letting the hips drop. A sagging body turns the row into a half-rep and lets the pulling muscles off the hook. Keep the plank line honest.
- Cutting the range short. Not touching the bar or not straightening the arms trains partial strength. Full range in both directions is what carries over.
- Rushing the reps. Yanking up and dropping down uses momentum instead of muscle. Slow, deliberate reps build far more.
- Only ever pushing. Skipping rows in favor of push-ups leaves the back of your shoulders underbuilt and your posture off-balance. Pull as much as you push.
Related Guides
Frequently Asked Questions
I have no bar at home. Can I still do inverted rows?
Yes. A sturdy dining table works well: lie underneath and grip the far edge. A broomstick resting across two chairs or a low set of rings or a suspension trainer also work. Anything waist-high that reliably holds your weight will do.
How many inverted rows should a beginner do?
Start with 3 sets of 8 to 15 reps at an angle you can control, two to three times per week. When 3 sets of 15 feel clean, make it harder by lowering your body angle or elevating your feet rather than adding more reps.
Are inverted rows enough, or do I need pull-ups?
For a true beginner, inverted rows are plenty. They build the horizontal pulling strength and healthy shoulders that make later vertical work possible. Pull-ups are a separate vertical pattern you can layer in once rows feel solid.
BodyTree tracks your progression through all 251 calisthenics skills — automatically generated programs, video proof, and a community of serious practitioners.
Get BodyTree — Free on iOS & Android