
Rings L-Sit Pull-ups: Your First Ring Pull-up
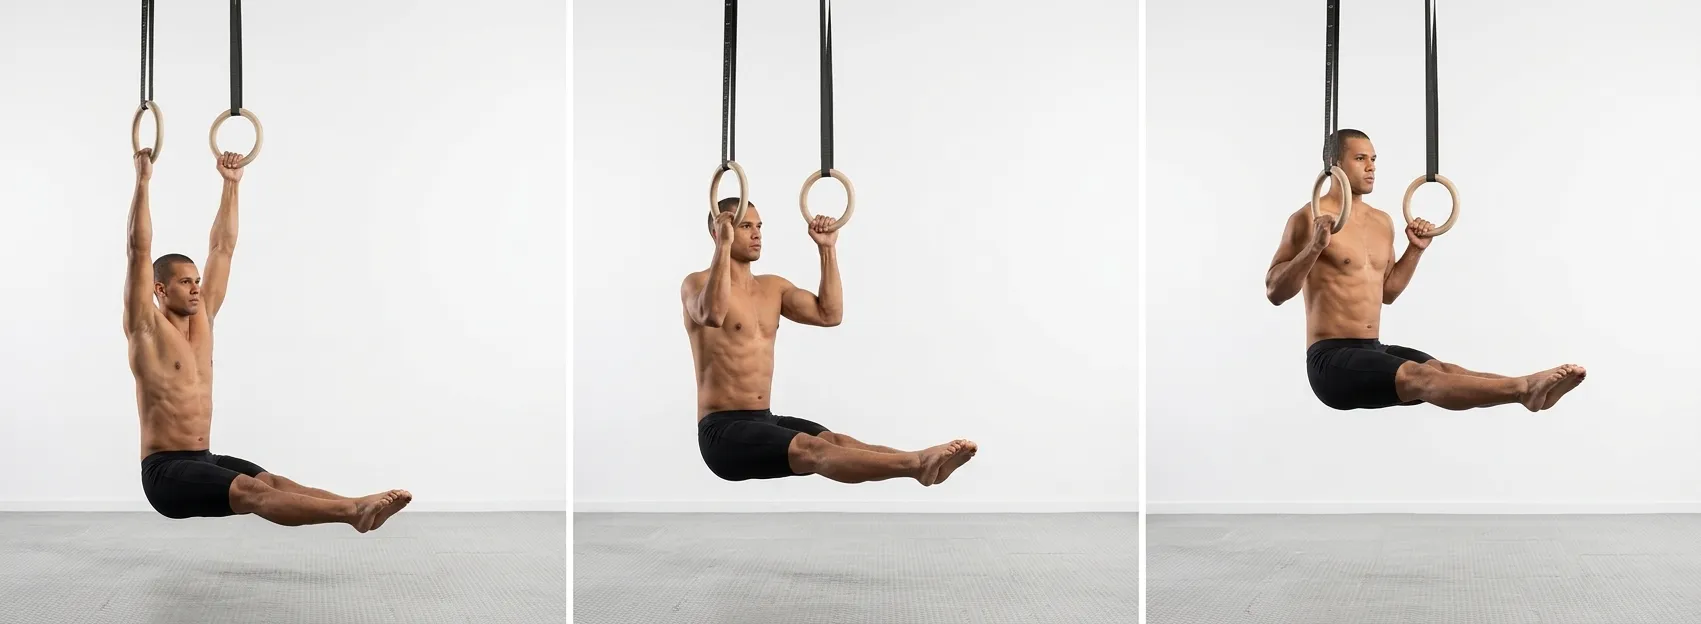
If you have never touched a set of gymnastic rings, this page is not asking you to start here. Rings L-sit pull-ups sit at the top of a road that begins with a dead hang and a single honest pull-up, and every step of that road is trainable at home on a doorway bar. What this guide gives you is the whole map: what the movement is, what has to be true before you try it, and what the first year of building toward it actually looks like. Nobody arrives at rings already able to do this. You get here one rep at a time, and the rungs below are not a consolation prize, they are the work.
What Are Rings L-Sit Pull-ups?
A rings L-sit pull-up is a pull-up performed hanging from gymnastic rings with your legs held straight out in front of you, at or above hip height, for the entire repetition. That leg position is the L. You start in a relaxed hang, set your shoulders, lift the legs, pull until the rings reach your clavicles, then lower back to straight arms without letting the legs sag or the rings swing.
It is the entry node of BodyTree's Ring Pull-ups branch, and it is a level 4 concentric movement. Everything that follows in that branch, wide grip ring pull-ups, archer pull-ups, and eventually the one-arm chin-up, is built on the shoulder position you learn here.
One thing worth saying early, because it removes a common piece of fear: this is not harder than the bar version. Trusted calisthenics references put the rings L-sit pull-up at the same level as the bar L-sit pull-up. Rings feel less stable, and that instability is real, but the strength requirement is roughly the same. If you do not have rings, the bar version is a completely acceptable substitute and you lose nothing by using it. Rings are a preference and a joint-comfort choice, not a difficulty upgrade.
Prerequisites
This is the honest checklist. If you cannot tick these yet, that is not a failure, it is just information about where your training should point next.
- A 30 second dead hang. Grip and shoulder tolerance come first. Nothing on rings works without it.
- Three to five strict pull-ups on a bar. Full range, from straight arms to chin clear, no kick and no swing.
- A 10 to 15 second tuck L-sit. On parallettes, on the floor, or hanging with the knees tucked. You need the hip flexors to be able to hold something before you ask them to hold it while you pull.
- Comfort on the rings themselves. A ring support hold and a set of ring rows will teach your shoulders that the rings move, so the first pull attempt is not also your first time on unstable handles.
If you are reading this with none of those, your real starting point today is a dead hang and a set of incline rows. That is the beginning of this exact chain, and it is a beginning available to anyone with a bar and a table.
The Progression Chain
Read that chain as two skills braided together. The pulling half runs from bar pull-ups to L-sit pull-ups. The compression half runs from a tuck L-sit to a full L-sit. Rings L-sit pull-ups are where the two meet, and most people find the compression half is what actually holds them back. Your arms will usually be ready before your hip flexors are.
That is useful, because it tells you what to train. If your legs drop halfway through the set while your arms still feel strong, the answer is more L-sit holds, not more pull-ups.
Sets, Reps, and Training Frequency
The BodyTree unlock standard for this node is 3 sets of 15 reps. That is a strength endurance target, not a first-rep target, and it is months away from your first clean repetition. Do not aim at it directly. Aim at the next rep.
Starting out: 3 to 4 sets of 3 to 5 reps, with two to three minutes of rest between sets. End the set the moment the legs sink below parallel or the rings start swinging on you. A short honest set is worth more than a long messy one.
Building: add one rep per set per week until you are doing sets of eight, then add a fourth set and start the count again. Slow is fine. Slow is what tendons need.
Frequency: two to three pulling sessions per week, with at least one full day in between. Pulling volume is easy to overshoot, because the muscles feel recovered long before the connective tissue is.
If you cannot hold the L yet: split it. Do the pull-ups with one leg extended and one leg tucked, then swap legs on the next set. Or run standard ring pull-ups and separate L-sit holds on parallettes in the same session and let them meet in a few months.
One ordering rule matters more than any of these numbers: put this movement early in the session, never at the end. The reason is in the prehab section, and it is the most common way a good exercise turns into a sore shoulder.
Coaching Cues
- Set the rings before you set yourself. Shoulder width apart, high enough that your legs clear the floor in the L, low enough that you can step down when the position breaks. Being able to bail calmly is part of the setup.
- Hang relaxed, then depress. Begin with the shoulders fully released and the shoulder blades up by your ears, then pull them down and slightly back. That first inch is the movement starting, not a wasted moment.
- Push the hands forward. In the L position your hands should sit roughly four to six inches ahead of your torso, because the legs have pushed your centre of mass forward. Think about pressing the rings away from you as you unlock the shoulders.
- Pull to the clavicles. Aim for the rings at collarbone height. Chest height comes later, as you get stronger, and it is not the target on day one.
- Keep the legs at or above parallel. The moment they drop below, the set is finished.
- Let the rings turn. A neutral grip with the palms facing each other is the friendliest position for the shoulder. Let the rings rotate to whatever angle they want during the pull rather than forcing them square.
- Own the descent. This is the part that differs from the bar. Lower slowly and keep the rings quiet. Half the value of the exercise is in refusing to let them wobble.
Common Mistakes
- Buying reps with the legs. Letting the L sag turns this into an ordinary ring pull-up with extra effort. Count only the reps where the legs held.
- Gripping the rings to death. Squeezing hard to stop the rotation fights the one advantage rings have. Hold firmly, but let them find their own angle.
- Training it last. Fatigue plus high shoulder torque is exactly the combination that irritates a rotator cuff. Early in the session, every session.
- Setting the rings too high. If you cannot step off when the position collapses, you will hang on past the point where form is gone.
- Skipping the bar version. Rings are not the harder, better option. Bar L-sit pull-ups build the same thing, and starting there is smart, not soft.
- Cutting the range. Stopping short of straight arms at the bottom hides the hardest and most valuable part of the rep.
Prehab: Keep the Rotator Cuff Ahead of the Pull
Holding the legs out in front pushes your centre of mass forward, so your shoulders have to press forward to stay under the rings. That extra forward push means more torque at the shoulder joint than a plain pull-up produces, and the rotator cuff is what manages it. The cuff is small, and it tires faster than the lats and biceps do. Once it is tired, the head of the upper arm bone is less well controlled in the joint, and that is where shoulder pain usually begins.
Three practical answers:
- Train it early. Never place this at the end of a session, after your pulling is already cooked.
- Add direct cuff work. Band external rotations, side-lying external rotations, and light shoulder blade drills two or three times a week. Five minutes is enough.
- Cut the set at the first form break. The last two ugly reps carry most of the risk and almost none of the benefit.
There is a genuine upside to rings here. Established references on tendon pain note that moving pull-ups and chin-ups from a fixed bar to rings often reduces or clears up elbow and shoulder symptoms, because the fixed grip on a bar locks the elbow and shoulder into one path while rings let the hands rotate freely. If bar pulling has been nagging your elbows, the rings version may be the more comfortable option rather than the more advanced one.
One distinction worth keeping: an exercise that feels hard and leaves you fine the next session is different from one that gets worse week over week. The second kind is a signal to back off and, if it persists, to see a professional.
Longevity: Training This for Years
Rings reward patience more than almost anything else in bodyweight training, because the instability means your nervous system has to catch up alongside your strength. That takes weeks you cannot skip.
A few habits that keep this movement in your programme for years rather than months. Balance the pulling with pressing: dips, push-ups, and support holds keep the shoulder joint even, and a puller who never presses ends up with a predictable ache. Keep dead hangs and shoulder blade work in your warm-up permanently, even once they feel easy, because they are cheap insurance. Deload when progress stalls for two weeks running rather than pushing through it. And treat the tendon timeline as the real timeline: muscle adapts in weeks, connective tissue in months, and the gap between those two numbers is where most avoidable injuries live.
If you build this slowly, the rings L-sit pull-up stops being a goal and becomes something you can simply do, on any day, for a very long time.
Related Guides
Frequently Asked Questions
Are rings L-sit pull-ups harder than the bar version?
No. Trusted calisthenics references rate them at the same level as bar L-sit pull-ups. Rings feel less stable but the strength requirement is comparable, so if you have no rings the bar version is a fine substitute.
Do I need a full L-sit before I try these?
Not to start. A 10 to 15 second tuck L-sit is enough to begin, and you can train the movement with one leg extended and one tucked. The standard for a counted rep is legs at or above parallel.
How long does it take to get from a first pull-up to this?
For most people training pulling two or three times a week, several months. The limiting factor is usually hip flexor endurance rather than pulling strength, so train L-sit holds alongside the pull-ups.
Why do my shoulders ache after these?
Holding the legs forward adds shoulder torque, which fatigues the rotator cuff faster than a normal pull-up does. Place the exercise early in your session, add light external rotation work, and end each set at the first form break.
BodyTree tracks your progression through all 251 calisthenics skills — automatically generated programs, video proof, and a community of serious practitioners.
Get BodyTree — Free on iOS & Android