
Kipping Pull-ups: How to Learn It
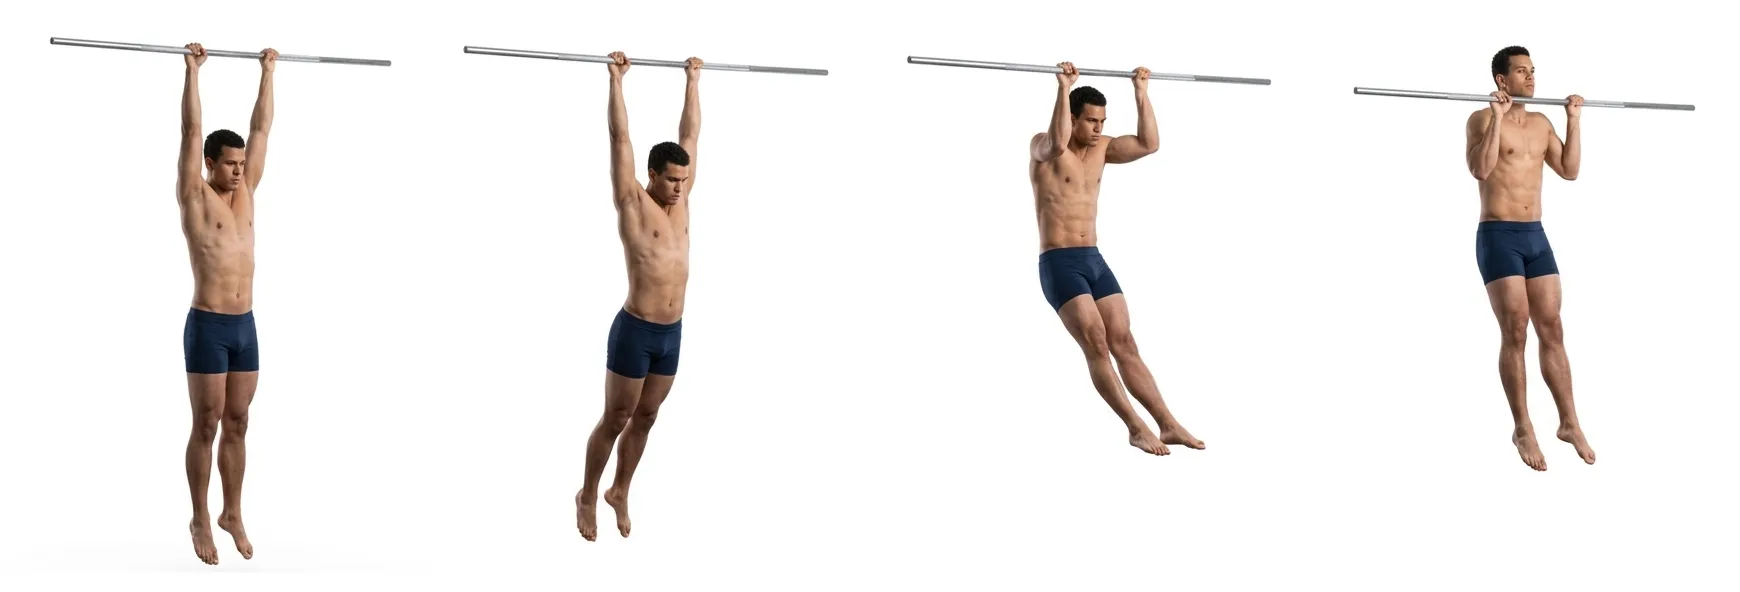
If you have watched someone swing up to a bar in a smooth arc and thought "that looks fun, but there is no way that is for me," this guide is written for you. Kipping pull-ups look chaotic from the outside, and a lot of people are told they are either cheating or dangerous. Neither is quite true. A kipping pull-up is its own movement with its own timing, and learning it is mostly a coordination job rather than a strength job.
Here is the honest part, up front. The kip is not your entry point into pulling. Your entry point is a dead hang, then an inverted row you can do off a low bar or a sturdy table edge, then a slow negative from the top of a pull-up. Established calisthenics methodology is consistent on this: you do not train the kip until you own strict dead-hang pull-ups. That is not gatekeeping, it is joint insurance. Read on and you will get both the road to that point and the technique for when you arrive.
What Is the Kipping Pull-up?
A kipping pull-up is a pull-up that borrows momentum from your hips. You hang from the bar and swing gently between two shapes: an arch, where the chest opens and the hips travel forward, and a hollow, where the ribs pull down and the hips travel back. That oscillation stores horizontal momentum. At the right instant you convert it into vertical travel and finish the rep by pulling your chin over the bar.
In the BodyTree tree this sits at level 2 of the Explosive Pull-ups branch, which is the branch that eventually leads to clapping pull-ups and airtime work. Its low level number is a common source of confusion. A low number means the movement itself demands less raw strength than the ones above it, not that it is the first thing a new trainee should do. Kipping ranks low precisely because momentum does some of the work for you.
That is also the honest case for learning it. A kip is a conditioning tool, it lets you accumulate pulling volume when your strict reps have run out, and it is the timing you will reuse later in kipping muscle-ups and in almost every rings skill that involves a swing. Even a lifter who never needs the assistance benefits from owning the rhythm.
Prerequisites
Before you kip, you need three things.
- Strict dead-hang pull-ups. Not one desperate rep. Comfortable, controlled reps from a full hang with the chin clearly over the bar. This is the non-negotiable one.
- A dead hang you can hold for 30 seconds. Grip and shoulder conditioning have to arrive before you start loading a swing.
- A hollow body position you can find on the floor. If you cannot pull your ribs down and flatten your lower back while lying on your back, you will not find that shape in the air.
If you are not there yet, you are not behind, you are simply earlier in the same chain. The road from zero looks like this: hang from the bar for time, train inverted rows under a waist-high bar or a table edge, then jump to the top of a pull-up and lower yourself as slowly as you can. Those three build the strict pull-up, and the strict pull-up unlocks this page. Most beginners training two or three times a week get there in a few months.
One more filter. If your shoulders have a history of dislocation, labral trouble, or rotator cuff pain, skip the kip entirely for now and keep building strict strength. This movement asks the shoulder to absorb load at the bottom of a swing, and a shoulder that is already unhappy is the wrong place to test that.
The Progression Chain
The chain above is the explosive branch itself. The kip is its front door, and everything after it adds speed rather than swing: explosive strict pull-ups, then a kipping rep with enough height to clap, then the same clap without any kip at all.
Feeding into that front door is the standard pulling chain, which is where a first-timer actually starts: Jumping Pull-ups, then Bar Pull-up Eccentrics, then Bar Pull-ups. The unlock standard on the eccentric step is 3 sets of 5 slow lowers, and clearing it is the single best predictor that your first strict rep is close.
Sets, Reps, and Training Frequency
The unlock standard in the app for a concentric movement is 3 sets of 15 reps. For the kip, treat that as a conditioning target rather than a strength target, because that is what the movement is. You are chasing an unbroken, quiet rhythm across the set, not grinding.
A practical way to build toward it:
- Weeks 1 to 2: arch-to-hollow swings only, no pull. 4 or 5 sets of 6 to 8 swings, resting fully. You are learning a shape, so stop the set the moment the rhythm gets ragged.
- Weeks 3 to 4: add one pull at the end of a swing sequence. 4 sets of 3 to 5 reps.
- Week 5 onward: build sets of 8, then 10, then 15, always stopping while the reps still look identical to each other.
Train it two or three times per week with at least a day between sessions, and put it early in the workout while you are fresh. Fatigue is the single biggest risk factor here. A tired body dropping into the bottom of a swing is exactly the scenario that turns a fun skill into a shoulder problem, so the last rep of your last set on a heavy day is the wrong place to practise kipping.
Keep your pulling balanced against your pushing. If your push progressions are running more than a step ahead of your pulls, add a horizontal row rather than more kipping. Trusted calisthenics references are blunt about this: extra horizontal rowing is the standard fix for the hunched-forward posture most desk workers bring to the bar.
Coaching Cues
- Learn it with your feet on the ground first. Stand under a bar you can reach, keep your toes down, and practise pushing the shoulders and hips forward into the arch, then letting them snap back into the hollow. No swing, no load, just the shoulder motion. This is the safest way to find the pattern.
- Let the shoulders relax and rise in the arch. Your shoulder blades should be elevated and loose through the swing, then actively pulled down as the pull begins, and finish down and slightly squeezed together at the top. Reverse it on the way back down.
- Pull as you enter the hollow, not as you leave the arch. The timing is everything. The pull should coincide with your shoulder angle closing, which is the moment the hips have finished travelling back.
- Do not drop straight off the top. Push away from the bar and let the arms and shoulders open in a controlled motion so you land back in the arch, ready for the next rep.
- Aim for quiet. A good kip makes almost no noise on the bar. Clanking and jerking mean you are muscling the swing instead of riding it.
Common Mistakes
- Using the kip to fake a pull-up you do not have. This is the one that gets people hurt. If your strict pull-up is not solid, the kip is not assistance, it is a way to load a shoulder that has no strength reserve to absorb it. Build the strict rep first.
- Bending at the knees to generate the swing. The drive comes from the hips and the arch-to-hollow shape change, not from cycling the legs. Keep the legs long and together.
- Chasing reps while the rhythm falls apart. The moment two reps stop looking the same, the set is over. Ragged kipping is the version that costs you shoulders.
- Practising it fatigued or at the end of a session. Momentum movements need a fresh nervous system. Put them first.
- Training through shoulder pain. If the shoulders start to ache from this movement, take a break from it and go back to strict work and the feet-on-ground drill. Pain is information, not weakness.
Prehab and Longevity
Kipping loads the shoulder in a stretched, dynamic position, which is a bigger ask than any strict pull-up. Three habits keep that sustainable.
Build the scapula, not just the arm. Scapular strength and control has an outsized effect on how the shoulder feels, and it is the first thing worth adding when a shoulder starts complaining. Scapular pulls from a dead hang, prone Y-T-W raises, and band pull-aparts all belong in your warm-up.
Warm the shoulders before you swing. Shoulder dislocates with a band or broomstick, a few sets of easy dead hangs, and slow arch-to-hollow swings with the feet down are enough. Cold shoulders and a first-rep kip are a poor combination.
Let the hands rotate when the elbows complain. A fixed bar locks the wrist, elbow, and shoulder into one path, and for some people that path irritates the elbow tendons over time. Moving the same movement to rings, where the hands are free to rotate, often reduces or removes those symptoms outright. If your elbows nag after bar work, that swap is the first thing to try.
If soreness in a tendon does show up, the modern approach is movement and graded loading rather than complete rest. Reduce the range or the reps, keep training the area at a level that does not aggravate it, and rebuild slowly. Complete rest tends to leave the tendon weaker than it started.
Related Guides
Frequently Asked Questions
Are kipping pull-ups cheating?
No, but they are a different exercise. A kip converts hip momentum into vertical travel, so it demands less pulling strength than a strict rep. Use it as a conditioning tool and as timing practice for later skills, not as a substitute for strict pull-ups.
Are kipping pull-ups bad for your shoulders?
They carry more shoulder risk than strict pull-ups, mostly because a fatigued body dropping into the bottom of a swing can stress the rotator cuff. The risk drops sharply if you already own strict pull-ups, train them fresh rather than tired, and stop the set when the rhythm degrades.
Can a beginner learn kipping pull-ups?
A beginner can learn the arch-to-hollow shape with their feet on the ground on day one, and should. The full kipping pull-up waits until strict dead-hang pull-ups are comfortable, which for most people training two or three times a week is a few months away.
What do kipping pull-ups lead to?
They open the explosive pulling branch: explosive bar pull-ups, kipping clapping pull-ups, then strict clapping pull-ups. The same arch-to-hollow timing also underpins the kipping muscle-up and most rings swing skills.
BodyTree tracks your progression through all 251 calisthenics skills — automatically generated programs, video proof, and a community of serious practitioners.
Get BodyTree — Free on iOS & Android