
Muscle-up Negatives: How to Learn It
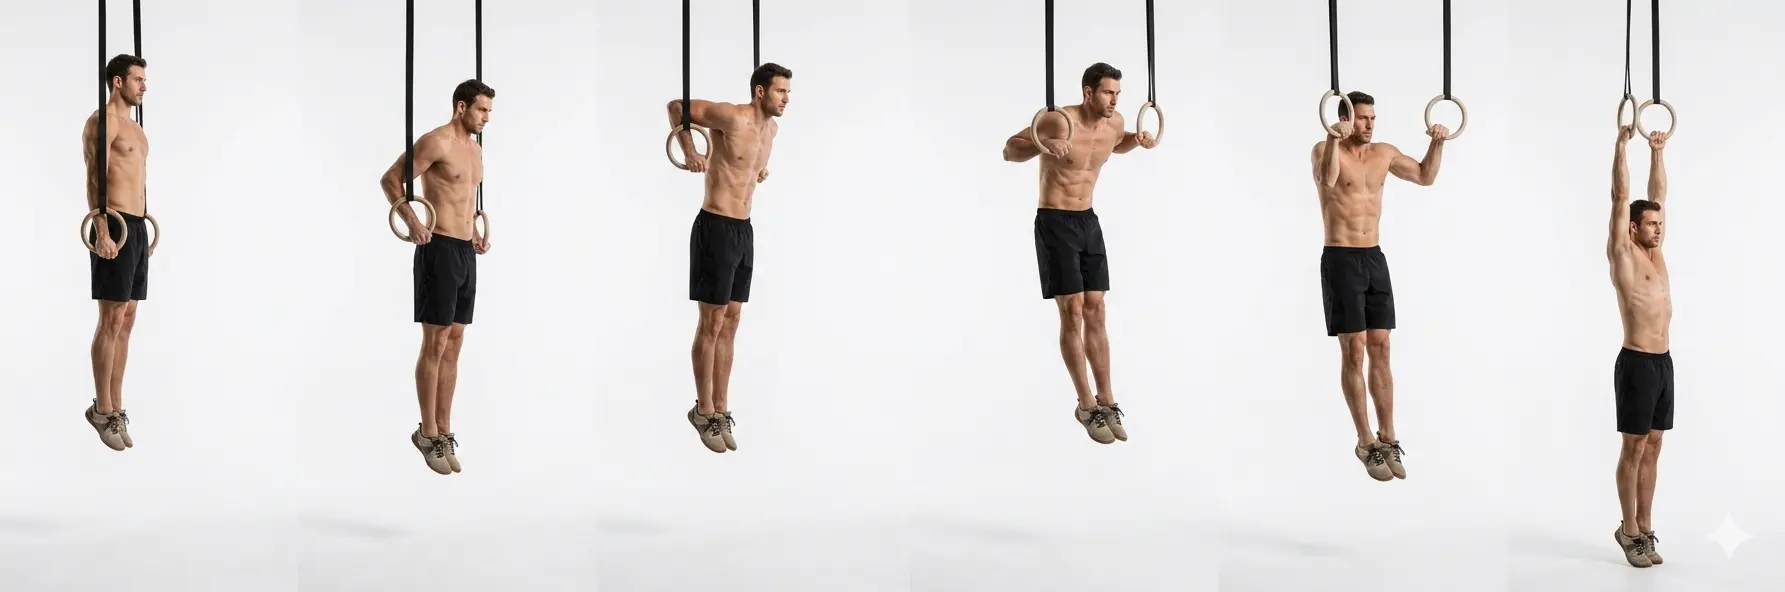
If you have ever watched someone pull over a bar or a pair of rings and land on top in a smooth support, and quietly thought I could never do that, this guide is written for you. You can. The muscle-up looks like one explosive trick, but it is really two skills you may already be building: a pull and a dip, joined by a transition in the middle. Muscle-up negatives are how you teach your body that transition slowly and safely, by lowering through it under control before you ever try to power up through it. You do not need a gym, a coach, or a background in gymnastics. You need a set of rings or a sturdy bar, the patience to go slow, and a starting point that is honest about where you are today.
What Is a Muscle-up Negative?
A muscle-up negative is the muscle-up performed in reverse and slowly. You begin at the top, in the support position above the rings or bar with your arms locked out, and you lower yourself down through the hardest part of the movement, the transition, until you finish hanging at the bottom with straight arms. That is one repetition.
Training a movement by lowering through it is called eccentric work, and it is one of the most reliable tools in all of calisthenics. Your muscles are far stronger lowering a load than lifting it, so a controlled negative lets you spend time in the exact position that would otherwise throw you off, building strength and coordination in the transition without needing to conquer it from the bottom yet. Every slow lower is a rehearsal for the pull that will eventually take you back up.
Your True Starting Point (Prerequisites)
The muscle-up is the destination, not the entry fee. Before you chase the negative, make sure the two ends of the movement are solid on their own, because the negative asks you to control both.
- A dead hang. Can you hang from the bar or rings with straight arms for 20 to 30 seconds without your grip failing? This is the foundation of everything overhead.
- A clean pull-up. A few honest, full-range pull-ups mean your back and arms can handle the top half of the pulling load. If you are not there yet, start with dead hangs, ring rows, and pull-up negatives first.
- A solid dip. The finish of a muscle-up is a dip pressed out to a locked support. Comfortable parallel-bar dips or a strong ring support hold tell you the top position is safe for your shoulders.
- The false grip. On rings, learn to sit your wrist over the ring so your forearm can carry you through the transition. It feels strange at first. Practice holding it in a dead hang before you add the lower.
If any of these is missing, that is not a failure, it is simply your next step. Build the base and the negative will be waiting.
Where This Fits: the Progression Chain
You start where you are now, at the top of the movement, and lower slowly through the transition to a full hang. From there you add a hip-driven kip to earn your first full muscle-up, and finally strip the kip out for a strict, controlled pull to support. Notice that the negative comes before any version that travels upward. That is deliberate: you earn the strength on the way down first. Each stage is a small, reachable win, not a leap.
Sets, Reps, and Frequency
Muscle-up negatives are trained for quality, not exhaustion. Aim for 3 sets of 5 slow lowers, and make each lower last. A useful target is a controlled descent of 3 to 5 seconds through the transition, gradually working toward 8 to 10 seconds of true control as you get stronger. The moment a rep turns into an uncontrolled drop, the set is over. A fast fall teaches your joints nothing good.
Two focused sessions a week is plenty, spaced with at least a day of rest between them, because eccentric work creates real muscle soreness the first few weeks. Treat the negative as the centerpiece of a pulling day, done while you are fresh, not tacked on at the end when your grip is fried. When you can complete 3 sets of 5 with genuine control over the whole descent, you have built the strength that a first muscle-up is made of.
Coaching Cues
- Start tall. Begin in a strong support with arms locked and shoulders pressed down, not shrugged up around your ears.
- Lead with the chest. As you lower, let your chest stay over your hands and lean forward into the transition rather than dropping straight down.
- Row the elbows. Think of the transition as a slow row happening in reverse, keeping the elbows drawing back and in rather than flaring wide.
- Own the middle. The transition is where most people speed up. That is exactly where you slow down. Fight for control through the sticking point.
- Finish long. End in a full dead hang with straight arms and an active shoulder, ready to reset for the next rep.
Common Mistakes
- Free-falling the transition. If you drop through the middle instead of lowering through it, you skip the only part that builds the skill. Slow it down, even if that means fewer reps.
- Losing the false grip on rings. When the wrist slips off the ring, the transition collapses. Rebuild the grip before adding volume.
- Flaring the elbows wide. Wide elbows leak strength and stress the shoulder. Keep them tracking back and close to the body.
- Chasing reps too soon. Grinding out ten sloppy negatives builds bad habits and cranky elbows. Five clean lowers beat ten rushed ones every time.
- Skipping the base. Attempting negatives without a real pull-up and dip turns a training tool into an injury risk. Earn the prerequisites first.
Prehab: Protect the Elbows and Wrists
The transition loads your elbows and wrists in a bent-arm, twisting position, and on rings the false grip adds real strain to the forearm and wrist. The research on tendon loading is clear that these tissues adapt more slowly than muscle, so they need a gentle on-ramp. Spend two or three minutes before pulling on wrist circles, forearm stretches, and light banded work for the biceps and elbows. A small dose of prehab, done consistently, is what lets you keep training the skill instead of nursing a sore joint.
If your elbows or wrists start to complain, do not push through sharp pain. Back off the volume, shorten the range, and let the tissue catch up. Slower is faster here.
Longevity: Play the Long Game
A muscle-up is not built in a week, and it should not be. Trusted calisthenics references consistently show that connective tissue strengthens over months, not days, and that the athletes who reach the skill are usually the ones who let their joints adapt rather than forcing the pace. Keep your negatives controlled, respect soreness, and add hold time and control before you add attempts. Build it patiently and the muscle-up becomes a skill you keep for years, not a party trick that leaves your elbows aching.
Related Guides
Frequently Asked Questions
Do I need rings, or can I do muscle-up negatives on a bar?
Both work. Rings are more forgiving on the shoulders and let you learn the false grip, while a fixed bar demands a tighter transition. Start with whichever you have, and keep the descent slow and controlled on either one.
I can do pull-ups and dips but the negative still feels impossible. Why?
The transition uses a specific rowing-and-leaning pattern that pull-ups and dips do not train directly. That is normal and exactly why negatives exist. Give it a few weeks of slow lowers and the coordination will come.
How long until muscle-up negatives lead to a full muscle-up?
It varies, but most beginners who train negatives twice a week with real control are ready to attempt a kipping muscle-up within a couple of months. Let clean, slow negatives be your signal that you are ready, not the calendar.
Is it normal to be sore after eccentric work like this?
Yes. Lowering slowly under load creates more muscle soreness than lifting, especially in the first few weeks. Space your sessions with rest days and the soreness settles as your body adapts.
BodyTree tracks your progression through all 251 calisthenics skills — automatically generated programs, video proof, and a community of serious practitioners.
Get BodyTree — Free on iOS & Android