
PB Jumping Dips: How to Learn It
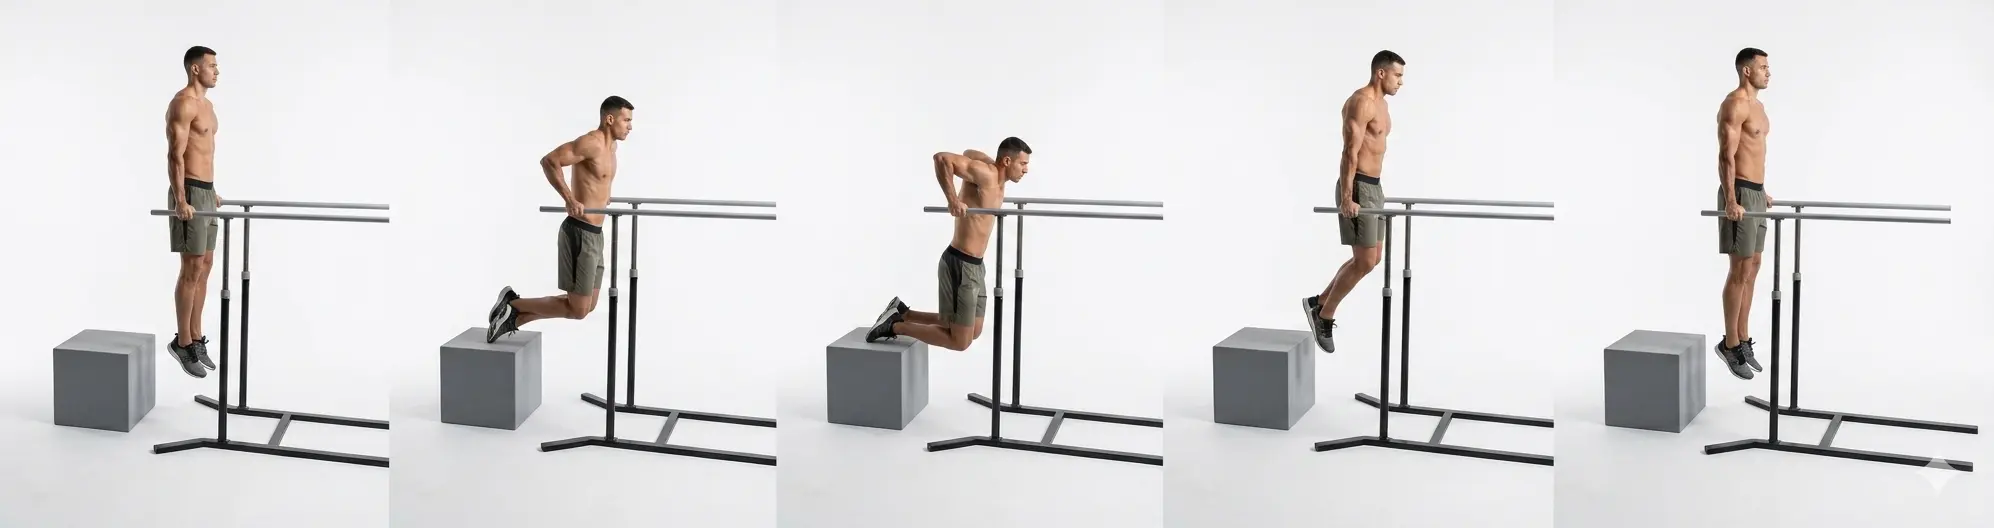
If you have never done a single dip, this is exactly where you begin, and there is no shame in starting here. A full dip asks you to lower your whole bodyweight and press it back up with your arms alone, which is a lot to ask of a body that has never trained pushing strength. The parallel bar jumping dip solves that by letting your legs quietly share the load: you sink into the bottom, then use a small jump to help your arms press back to the top. You get to practice the real movement today, at a difficulty your body can actually handle, and you slowly hand more of the work over to your arms as you get stronger. No gym membership and no athletic background required, just a set of parallel bars or two sturdy surfaces at hip height. According to Overcoming Gravity by Steven Low, dips are one of the best upper body pushing exercises there is, almost an upper body version of the squat, and this jumping version is the front door to all of it.
undefined
A parallel bar jumping dip is a dip you assist with your legs. You start at the top in a support position with straight arms and your shoulders pushed down away from your ears. You lower under control until your hands are close to your armpits, feeling a stretch across the chest and shoulders, then you use a gentle jump or leg drive to help press back up to the top. The aim is to lean on your legs only as much as you need to, so that over weeks your arms and triceps take on more and more of the press.
This is a level 1 move for a reason. It teaches the full range of motion and the shoulder positioning of a real dip while removing the strength barrier that stops most beginners from doing even one clean rep. Steven Low notes you can set a low block to squat jump from at the bottom, or simply keep your feet on the ground and use your legs for as little assistance as possible. Either way, you are building the exact pattern you will use for full dips later.
undefined
Honestly, very little. You need a set of parallel bars, parallettes, or two stable surfaces roughly hip to waist height that can hold your weight, and enough shoulder comfort to sink into the bottom position without sharp pain. That is the whole list. You do not need to already be strong, and you do not need to be able to do a push-up first.
The one thing worth respecting is shoulder mobility. The bottom of a dip is a deep stretch for the chest and the front of the shoulders. Overcoming Gravity actually frames this stretch as a feature, not a bug: sinking into it now builds the flexibility you will need much later for moves like muscle-ups. Use your legs to take the edge off if the stretch feels too intense at first, and ease deeper over time. If you feel genuine pain rather than a stretch, especially near the front of the chest, back off, work on shoulder mobility, and progress pain-free rather than pushing through.
undefined
Jumping dips are the first rung on the parallel bar dip ladder. Once you can comfortably do 3 sets of 15 reps with minimal leg help, you have earned the next step: PB dip eccentrics, where you jump to the top and then lower for a slow 6 to 8 seconds. Eccentric, or lowering, work is where a huge amount of dip strength is built, because your body is stronger at controlling a descent than at pressing up. From there you graduate to full PB dips, the standard unassisted movement, and then to L-sit dips that add a core challenge on top. Each step is a small, honest jump in difficulty, and the jumping dip is what makes the whole chain reachable from zero.
undefined
Overcoming Gravity programs jumping dips for untrained beginners as 3 sets working from 5 reps up toward 15, with about 3 minutes of rest between sets and a controlled tempo. That rep range is your roadmap: start wherever you can manage clean reps, even if that is only 5, and add a rep here and there each week. When you can hit 3 sets of 15 with your legs barely helping, it is time to move to eccentrics.
Two to three sessions a week is plenty for a beginner, with at least a day of rest between hard pushing days so the muscles and connective tissue can adapt. Consistency beats intensity here. Three honest sessions a week for a month will take you further than one heroic session you need a week to recover from. Pair these with a pulling movement like inverted rows or jumping pull-ups to keep your shoulders balanced.
undefined
- Start tall. Support position with arms locked and shoulders pushed down, not shrugged up toward your ears.
- Lower with control. The descent is where strength is built, so resist gravity rather than dropping. Aim for your hands to finish near your armpits.
- Track the elbows back. Let your elbows travel backward as you descend rather than flaring wide.
- Use your legs as a dimmer, not a switch. Give only as much jump as you need to complete the rep, and try to give a little less over time.
- Sink into the stretch. A deep bottom position builds the shoulder mobility you will need later, so go as deep as your flexibility comfortably allows.
undefined
- Cutting the depth short. Half-range dips build half-range strength. Lower all the way to the bottom every rep, using more leg assistance if you need to, rather than shortening the movement.
- Over-relying on the jump. If your legs do everything, your arms never get stronger. Consciously ask your triceps and chest to do the pressing, and use the legs only to bridge the gap.
- Rushing the descent. Dropping fast wastes the most valuable part of the rep. Slow, uniform lowering is where the adaptation happens.
- Pushing through pain. A stretch is fine and expected. Sharp pain, especially at the front of the chest, is a signal to stop, work on mobility, and return when you can move pain-free.
undefined
Dips load the shoulders, elbows, and wrists, so a little care up front keeps you training for years. Warm up the shoulders and wrists before you dip: a few minutes of arm circles, band pull-aparts, and gentle wrist rocks on the bars go a long way. Overcoming Tendonitis makes the case that connective tissue adapts more slowly than muscle, which is exactly why the jumping and eccentric stages exist. They let your tendons catch up to your growing strength instead of being overloaded before they are ready.
Respect the shoulder stretch at the bottom rather than forcing it, ease into depth gradually, and never train through sharp joint pain. If a dip ever aggravates the front of your chest or your elbows, shelve it briefly, dial back the range, and rebuild. Playing the long game here means you will still be dipping happily long after the people who rushed have had to stop.
Related Guides
Frequently Asked Questions
undefined
undefined
undefined
undefined
undefined
undefined
undefined
undefined
BodyTree tracks your progression through all 251 calisthenics skills — automatically generated programs, video proof, and a community of serious practitioners.
Get BodyTree — Free on iOS & Android