Rings Shoulder Stand: How to Learn It, Train It, and What Comes Next
The rings shoulder stand is the first inverted skill in the Rings Handstands branch and the gateway to the rings strap handstand and, eventually, the freestanding rings handstand. Unlike floor or parallette handstands where the hands are fixed, every inverted rings position is controlled entirely by wrist pressure on a moving, unstable surface. According to Overcoming Gravity, the shoulder stand teaches exactly that skill — and once you own it, all subsequent rings handstand work builds on the same mechanics.
What Is the Rings Shoulder Stand?
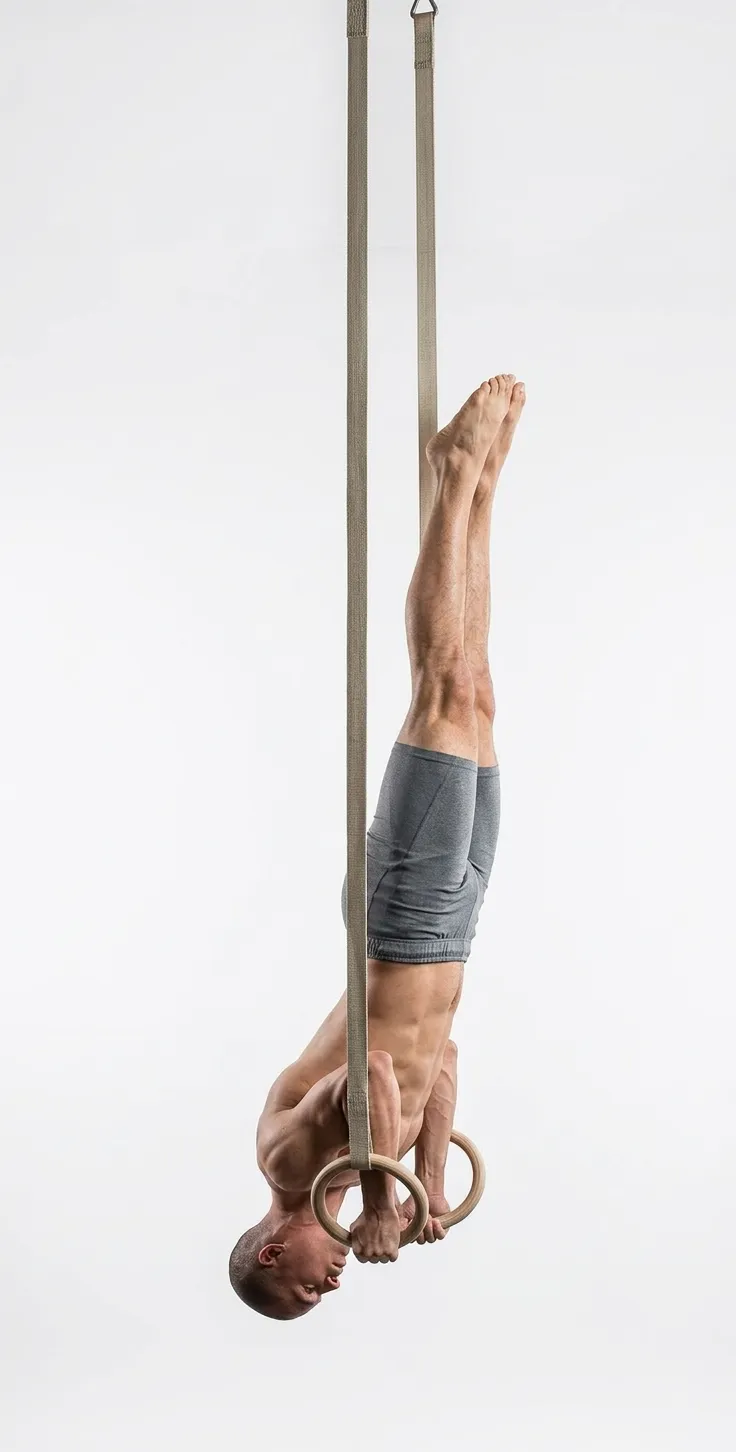
The rings shoulder stand is an inverted hold in which the body is supported with fully bent arms, rings pressed into the chest, and the entire body rising above the rings. Rather than bearing weight through straight arms and open shoulders, the athlete uses bent-arm leverage — elbows tucked tight to the sides, hands at shoulder height — to create a stable base. Balance is maintained exclusively through wrist pressure on the rings, not through arm position changes.
In the BodyTree skill tree the rings shoulder stand sits at Level 5 in the Rings Handstands branch. It has no predecessor in the branch — it is the entry point — and feeds directly into the Rings Strap Handstand (Level 6) and eventually the Rings Handstand (Level 7).
Prerequisites
Before attempting the rings shoulder stand you should have:
- Deep ring dips. According to Overcoming Gravity, a solid familiarity with deep ring dips is required before learning this skill. The entry into the shoulder stand passes through the bottom of a deep dip position, and athletes who cannot handle that loading will stall immediately.
- L-sit on rings. The standard entry method begins from an L-sit position to generate hip momentum. Own the L-sit before learning the shoulder stand.
- Forward roll bail. Overcoming Gravity is explicit: if you are training on high rings, you must be able to execute a forward roll exit from an inverted position at least ten times before beginning any inverted rings work. Practice the bail before the skill.
- Wrist strength and mobility. The wrists are the sole balance mechanism in all inverted rings work. Wrist circles and active wrist warm-up should precede every session.
The Progression Chain
The three skills share a single mechanical principle: wrist control on an unstable base. The shoulder stand builds that wrist sensitivity with the rings close to the body (giving you mechanical advantage). The strap handstand moves the rings further away and demands a straight body. The freestanding rings handstand removes the strap contact entirely. Each step transfers the skill earned in the previous one.
Unlock criterion: 3 sets of 30-second holds before progressing.
How to Get Into the Position
Overcoming Gravity outlines a specific entry sequence:
- Set the rings low and pad the floor. Lower the rings as close to the ground as possible and place mats in front of you. If the rings must be high, a spotter is essential.
- Begin from an L-sit. The L-sit provides the hip momentum to drive your hips up over your head.
- Drive hips up while bending the arms. Two things must happen simultaneously: your hips rise up between the straps and your elbows stop bending. This timing is critical — if the arms bend too fast before the hips are up, you end up stuck at the bottom of the dip position with almost no way out.
- Control from the wrists once inverted. Once your hips are up, squeeze the rings into your chest (not so hard they tilt inward) and use wrist pressure to stabilize. Your hands should be gripped as tightly as possible at all times.
- Use the pike position for balance learning. Overcoming Gravity recommends the pike position over the tuck while learning. Though the tuck feels easier to raise, it is very hard to control in the forward/backward plane for beginners. The pike uses the pelvis as a natural fulcrum for balance as the legs rise.
Scapular and Body Positioning
The technical cues for the rings shoulder stand differ from floor handstands and must be learned separately:
- Scapulas depressed, neither retracted nor protracted. This is explicit in Overcoming Gravity. A depressed, neutral scapular position provides the stable base the shoulder stand requires. Over-retraction or protraction destabilizes the base.
- Elbows slightly in front of the body, tucked into the sides. Arms fully curled with hands at shoulder height in front of the shoulders. This is the loaded position that gives you mechanical advantage over the wrist balance.
- Body straight, or slightly hollow. Once inverted, the body should be as straight as possible. A slight hollow is acceptable and can actually improve control. The feet should be together and the legs active.
- Rings squeezed into the chest. The rings should feel stable, almost like parallettes, not swinging freely. You want to stabilize the rings as much as possible so wrist micro-corrections are effective.
According to Overcoming Gravity, the key insight is mechanical advantage: because your hands are much closer to your body than in a floor handstand, you have greater wrist leverage over the balance. This is why the shoulder stand, despite looking harder than a floor handstand, can actually be easier to hold once you own the entry.
Sets, Holds, and Training Frequency
The rings shoulder stand is an isometric hold. Overcoming Gravity's progression standard is 3 sets of 30-second holds before moving to the strap handstand.
Practical training approach:
- Train inverted rings skills 2–3 times per week, treating them as skill work rather than strength work. Fatigue degrades the wrist sensitivity needed for good holds.
- Start with accumulation sets — short holds of 5–10 seconds, resting, and repeating — rather than grinding for 30 seconds from day one.
- Add the shoulder stand after your primary strength work so the wrists and shoulders are warmed but not pre-fatigued from other shoulder-intensive lifts.
- A spotter or low-ring setup dramatically increases training volume. More attempts per session = faster skill acquisition.
Coaching Cues
- Press the rings outward constantly. The natural instinct is to let the rings drift inward. Actively resist this — pressing the rings apart creates stability.
- Squeeze your grip throughout. Wrist control starts with grip. A loose grip cannot transmit the micro-corrections that keep the position stable.
- Keep your body absolutely still. Overcoming Gravity emphasizes that the key to the rings shoulder stand is keeping the body as still as possible while the wrists do the steering. Large body corrections amplify the instability of the rings.
- Think of your wrists as the steering wheel. On the rings, your hands are close to your body. That gives you significant mechanical advantage — use fine wrist pressure, not gross body shifts, to correct balance.
- Use a straddle momentarily if needed. Spreading the legs to hit the cables gives extra balance while you find the position. Close the legs once stable.
Common Mistakes
- Bending the arms too fast on entry. The most common beginner error. If the elbows collapse before the hips are between the rings, you fall into the bottom dip position with almost no way to press out. Timing the hip drive and arm bend is the whole entry skill.
- Letting the rings swing inward. Rings tipping inward means you are relying on the straps rather than wrist control. Press them outward from the moment you enter the position.
- Performing on high rings without a bail technique. Overcoming Gravity is direct: practice the forward roll exit at least ten times before training any inverted rings skill on high rings. Knowing how to get out is more important than knowing how to get in.
- Trying to hold with a banana body. Any arch in the back makes the position much harder to control. Engage the abs and glutes the moment you go inverted.
- Gripping loosely. The wrist is the control surface. A loose grip cannot transmit corrections and the rings simply slide.
What Comes Next: Rings Strap Handstand
Once you hold the rings shoulder stand for 3 sets of 30 seconds, the next step is the Rings Strap Handstand (Level 6). The entry is the same — press out of the shoulder stand position — but you extend the arms fully, lock out the elbows, and push the shoulders up toward the ears to open the shoulder angle completely.
According to Overcoming Gravity, the key markers for the strap handstand are: straight-body positioning, fully locked elbows, maximal scapular elevation with slight retraction, and progressive rotation of the rings from turned-in to parallel to turned-out. The feet may initially hook on the cables for balance, but the goal is to move them to the inside of the cables and eventually free from them entirely.
The principle from the shoulder stand carries forward: the wrists do the balance work. The only difference is that with straight arms the mechanical advantage is reduced, so the holds demand more refined wrist sensitivity. Everything you trained in the shoulder stand transfers directly.
Related Guides
Frequently Asked Questions
Is the rings shoulder stand harder than a floor handstand?
The entry is harder because of the timing required and the instability of the rings. But once inverted, the rings shoulder stand can actually be easier to hold than a floor handstand because your hands are close to your body, giving you significant mechanical wrist advantage. The skill transfers differently — rings balance is wrist-driven rather than finger-driven.
Do I need a spotter for the rings shoulder stand?
Not strictly required, but Overcoming Gravity strongly recommends one while learning. Alternatively, set the rings as low as possible and pad the floor in front of you so you can bail safely. A spotter allows you to attempt more reps per session, which is the fastest way to build the wrist sensitivity the skill requires.
Why does Overcoming Gravity recommend the pike entry over the tuck?
The tuck feels easier to raise but is very hard to control in the forward/backward plane for beginners because the mass is close to the body and changes rapidly. The pike uses the pelvis as a fulcrum that helps stabilize balance as the legs rise, meaning a higher volume of correct repetitions per session and faster skill acquisition overall.
Can I learn the rings shoulder stand if I cannot do a floor handstand?
Yes. The rings shoulder stand uses bent arms throughout, so floor handstand proficiency is not a prerequisite. You do need deep ring dips and an L-sit. That said, if you plan to continue to the rings strap handstand and rings handstand, floor handstand work in parallel will help the balance transfer considerably.
BodyTree tracks your progression through all 242 calisthenics skills — automatically generated programs, video proof, and a community of serious practitioners.
Get BodyTree — Free on iOS & Android